Are you looking for a detailed guide on how to change sender name in outgoing WordPress email? Well, the simple step-by-step guide is right here at Detailed Guide.
By default, WordPress uses ‘WordPress' as the sender name for all outgoing WordPress notification emails. This doesn't look very professional, and you may want to change that to your business name.
So, in this very detailed article, we will show you how to easily change the default sender name and email address in outgoing WordPress emails.
READ ALSO: 7 Best AdSense Optimized WordPress Themes
Why Do You Want to Change Sender Name in Outgoing WordPress Email?
WordPress sends several email notifications to the site administrator as well as other users on your website. This includes important email notifications such as forgot password emails, website error and recovery emails, new user registration, and more.
By default, it uses ‘WordPress' as the sender's name and a non-existent email address (wordpress@yourdomain.com) as the sender's email.
Many spam filters block your WordPress emails, believing them to be junk. Sometimes it does not even make it to the spam folder but is deleted immediately due to filters.
The outgoing email notifications are important, and you should use your own brand and email address. This increases the authenticity of your brand and increases name recognition among your users.
For instance, if you run an online store, then you would want customers to get email notifications with your store name as the sender. So, let's see how to change the default sender name and email address in outgoing WordPress email notifications.
Method #1. Changing Default Sender Name and Email using WP Mail SMTP
This method is easier and recommended for all WordPress users.
For this method, we'll be using the WP Mail SMTP Pro plugin. It is the best WordPress SMTP plugin, used by over 3 million website owners.
This plugin allows you to easily change the default sender name and email address for outgoing WordPress emails. It also helps you fix the WordPress email deliverability problem.
The first thing you need to do is install and activate the WP Mail SMTP Pro plugin.
Upon activation, you need to visit WP Mail SMTP » Settings to configure plugin settings. Under the Mail section, you can simply enter the email address and the name you want to use to send WordPress emails.
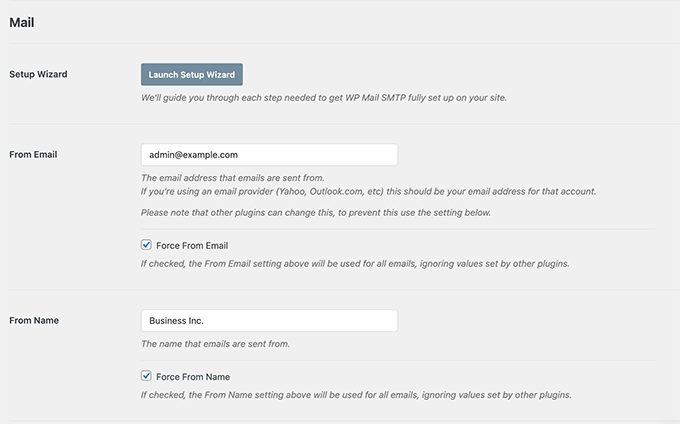
Below, you can find the options to set up an SMTP server to send WordPress emails. By default, the plugin will use the PHP method provided by your WordPress hosting company which is less reliable.
We recommend using any of the listed SMTP services to properly send WordPress emails for higher guaranteed deliverability.
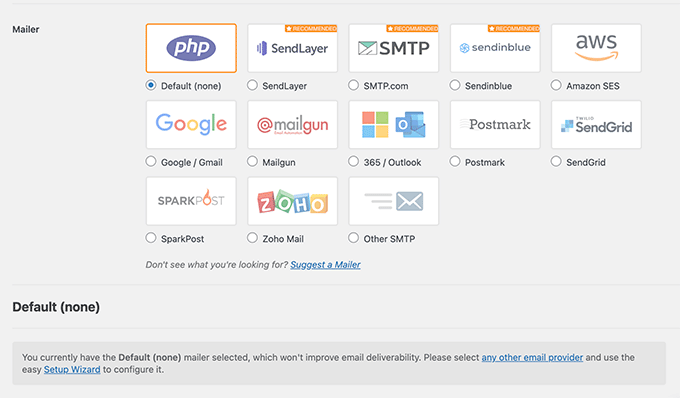
If you choose an SMTP service, then follow the on-screen instructions to connect the plugin with your SMTP service provider.
Don't forget to click on the ‘Save Settings' button to save your changes.
Test Your WordPress Emails
WP Mail SMTP Pro also allows you to test your WordPress email settings. Simply go to the WP Mail SMTP » Tools page and switch to the ‘Email Test' tab.
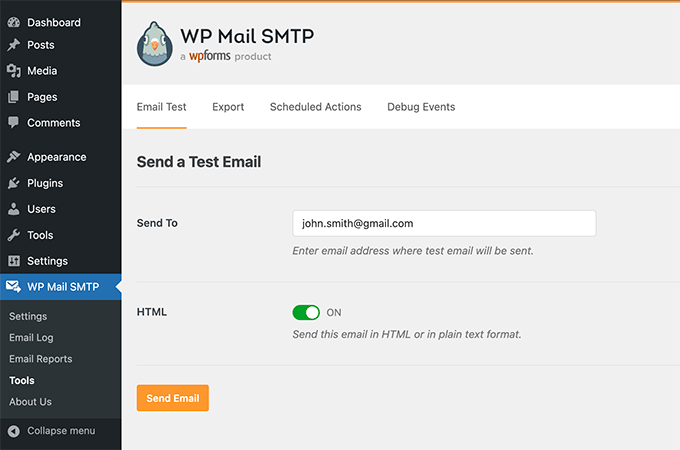
From here, you just need to provide an email address that you can access and then click on the ‘Send Email' button.
The plugin will now send a test email to the address you provided. You can check your inbox to make sure that you can receive WordPress emails and that it has the correct sender name and sender email address.
WP Mail SMTP works with all popular WordPress plugins like WooCommerce, WPForms, and more.
READ ALSO: How to redirect HTTP to HTTPS | Force HTTPS Using htaccess
Method #2: Changing Default Sender Name and Email using WP Change Email Sender
This method is only recommended if you don't use an SMTP service or if the first method is not working.
Using this method does not improve your WordPress email deliverability or make it easier to troubleshoot email issues.
However, if your WordPress emails are working, then it will allow you to change the sender name and email address.
First thing, install and activate the WP Change Email Sender plugin.
Upon activation, you need to go to Settings » General in your WordPress admin area. There you'll find the ‘Email Sender Name' and ‘Sender Email Addres's fields.
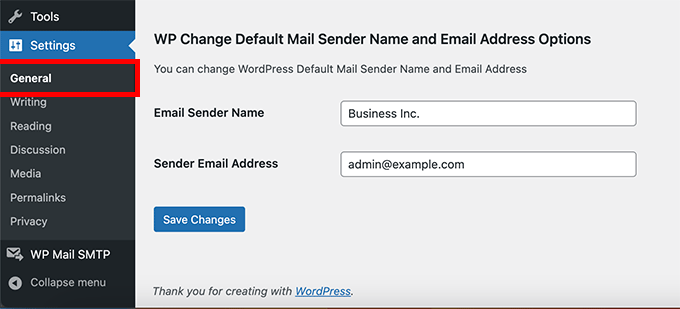
You will need to enter the name and email address you want to be used for outgoing WordPress emails.
Don't forget to click on the ‘Save Changes' button to store your settings.
That's all. Your WordPress notification emails will now show the name and email address you entered in the plugin settings.
There is no method provided by the plugin to test your email settings. You can do that by performing actions that generate WordPress notification emails, like creating a new user, requesting a password reset, and more.
READ ALSO: Top 10 Best WordPress Themes For Blogs
Method #3: Changing Sender Name and Email Address using WPCode
Another excellent way to change your sender name and email address is by adding a code snippet. And we recommend WPCode, the easiest and safest way to add code to WordPress.
You usually need to add code to your functions.php file, but WPCode makes it simple and easy to add this code snippet with just a few clicks.
Not only that, but WPCode has many other snippets available to help customize your site. Plus, you can easily add your custom snippets.
First, you need to install the free WPCode plugin. For more information, check out our step-by-step guide on how to install a WordPress plugin.
Next, click on Code Snippets » Add Snippet to your WordPress admin dashboard. Simply type ‘sender' into the search bar and press the ‘Use snippet' button under ‘Change Outgoing Email Sender'.
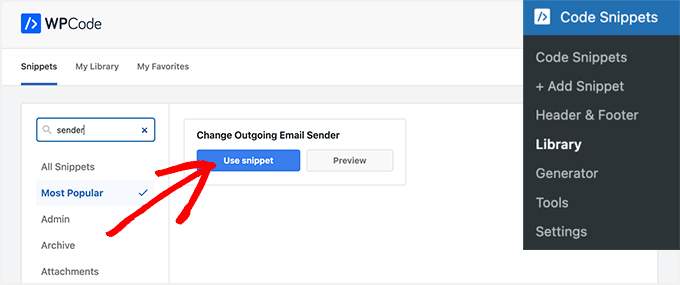
Then you'll be taken to the Edit Snippet page.
Here you need to update the sender's email and name in the code snippet.
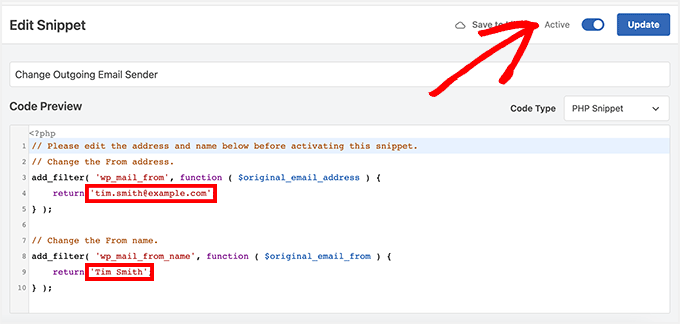
And then, switch the toggle to ‘Active' and click on the ‘Update' button.
One of the benefits of using WPCode is that it comes with a library filled with pre-made snippets.
There's a good chance you can find some to replace other plugins on your site, such as disabling automatic updates, allowing SVG files to be uploaded, or even using the Classic editor instead of the default block editor.
You don't have to use the library, either. You can also add any other code you ever need by selecting the ‘Add Your Custom Code (New Snippet)' button instead of searching the library.
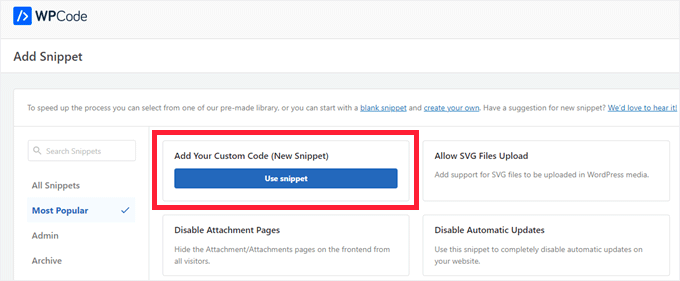
Then, all you have to do is just paste your own code in and decide where it should run on your site.
For example, you can copy and paste this snippet below into the WPCode's custom code snippet and customize it to change the sender name and email.
// Please edit the address and name below.
// Change the From address.
add_filter( 'wp_mail_from', function ( $original_email_address ) {
	return 'tim.smith@example.com';
} );

// Change the From name.
add_filter( 'wp_mail_from_name', function ( $original_email_from ) {
	return 'Tim Smith';
} );
READ ALSO: GetResponse Review – How to Start an Email List (Step-By-Step)
In Conclusion
Now that you have learned three (3) different ways on How to Change Sender Name in Outgoing WordPress Email, it's now up to you to choose which one works best for you.
We truly hope that this article helped you learn how to change the sender's name and email address in outgoing WordPress emails.
You may also want to see our guide on the best bulk email marketing services to bulk send emails to all your users and our comparison of the best WordPress page builder plugins to customize your site without any code.
Does this article meet your immediate needs? If yes, leave us a 5-star rating in the Review Box below. However, if not, leave a comment in the comment box to express your concern or ask a question, and we will get back to you as soon as possible.

Remember to Share this Article with your friends on social media!! Doing this helps us improve and grow our channel and also enables us to help more people online.
Thank You For Sharing!!!
Discover more from Detailed Guide Blog
Subscribe to get the latest posts sent to your email.


